Installing RSAT on a Unix operating system
Jacques van Helden, Bruno Contreras Moreira
2025-12-29
1 Introduction
This tutorial explains how to install the complete Regulatory Sequence Analysis Tools (RSAT) suite via GitHub or from a tarball archive in Linux or Mac OS X systems. This RSAT distribution contains: (i) the RSAT command line tools, (ii) the web server and (iii) the web services.
2 Requirements
Linux
- Operating system. If your Linux operating system (OS) is not Ubuntu some adaptation of the scripts used in the installation step will be necessary (e.g. system libraries).
- Package manager. The
apt-getpackage manager should be already installed in the command line and it is recommended to update to the latest version. - Git and Git LFS. If you are installing the GitHub
repositories the
gitandgit-lfsapplications should be available in the command line. You can installgitfrom here andgit lfsfrom here.
Mac OS X
Operating system. This RSAT installation protocol is aimed at Mac OS X in Mojave (v10.14) and Catalina (v10.15). RSAT installation in previous Mac OS X versions is feasible but a manual installation of packages (e.g.
brewpackages) is needed and it is beyond the scope of this tutorial.Xcode. The complete version of the Xcode application should already be installed in your Mac OS X. You can download and install Xcode from here. Please be aware that downloading Xcode versions for Mac OS X requires an Apple Developer account.
Package manager. The
brewpackage manager should be already installed in the command line and it is recommended to update to the latest version. You can installbrewfrom here. At the momentbrewin RSAT is only supported for Mac OS X in Mojave (v10.14) and Catalina (v10.15).Git and Git LFS. If you are installing the GitHub repositories the
gitandgit-lfsapplications should be available in the command line.
3 Overview of the installation steps
- Download an RSAT distribution archive.
- Configure your RSAT installation.
- Install your RSAT instance.
- Test your RSAT installation: the (i) RSAT command line tools, (ii) the web server and (iii) the web services (SOAP/WSDL and REST).
4 Downloading RSAT
You can clone the current RSAT development version from GitHub or download the latest RSAT stable release as a tarball from any of the RSAT servers.
 Cloning GitHub repositories
The RSAT development version in GitHub is composed of four
different repositories: (i) rsat-code, (ii) demo_files, (iii) motif_databases
and (iv) sample_outputs.
All of these need to be cloned and installed for RSAT complete function.
To clone these repositories, the git and git lfs applications should be
available in the command line for both Linux and Mac OS X systems.
## Choose a directory to install RSAT
export INSTALL_ROOT=~/packages
mkdir -p ${INSTALL_ROOT}/

## Check that git-lfs is installed
which git-lfs
## Install it if it is not avalable

## Make a clone of the different RSAT packages
cd  ${INSTALL_ROOT}/
git clone https://github.com/rsa-tools/rsat-code.git
git clone https://github.com/rsa-tools/demo_files.git
git clone https://github.com/rsa-tools/motif_databases.git
git clone https://github.com/rsa-tools/sample_outputs.git

## Create soft links to the data repositories
mv rsat-code rsat
cd rsat/public_html
ln -s ../../demo_files
ln -s ../../sample_outputs
ln -s ../../motif_databases

cd  ${INSTALL_ROOT}/rsat
5 Configuring RSAT
We will first specify an environment variable named RSAT
with the path to the rsat directory.
## Set the main RSAT directory path
export RSAT=${INSTALL_ROOT}/rsat
echo "RSAT ${RSAT}"


## Go to the main rsat directory
cd ${RSAT}
Linux
Semi-automatic configuration
A semi-automatic configuration of the RSAT installation can be
done by providing some minimal parameters such as: (i) an IP address for
the web server and services, (ii) a site name for the RSAT instance and
(iii) the RSAT main directory. We will customize the first two
parameters below, set the RSAT main directory and then run the
configuration script.
5.1 Setting the IP address for your web server
 Personal computer
If you install RSAT on a personal computer (e.g. a laptop) and intend to use it only for this machine, you can configure it with the local network’s IP.
 Server
If you install RSAT on a server or if you intend to provide service
to external users, please replace XXX.XXX.XXX.XXX below by
the actual IP address of your server (e.g. for Virtualbox Virtual
Machines, we set the IP to 192.168.56.101). The ip util
should be already available in the command line.
5.2 Choose a site name for your RSAT instance
You can choose an arbitrary name for your RSAT instance. For this
tutorial, we will call it my_rsat, but you are welcome to
use another site name.
5.3 Configuration of RSAT parameters
## Semi-auto configuration for VirtualBox VM
## (adapt IP address if required)
perl perl-scripts/configure_rsat.pl -auto  \
  rsat=${RSAT} \
  rsat_site=${RSAT_SITE} \
  rsat_www=http://${MY_IP}/rsat/ \
  rsat_ws=http://${MY_IP}/rsat/ \
  package_manager="apt-get" \
  ucsc_tools=1 \
  ensembl_tools=1
You can add some additional options to the previous command, e.g. enter your mail address as server admin, activate some specific tools that are disabled by default.
Advanced configuration
To configure all options, you can run the script
configure_rsat.pl as below. An interactive prompt will open
and you will be able to refine all the configuration options by choosing
custom parameter for your RSAT instance (e.g. the email of the local
admin, the organism group, etc. ).
If you want to secure your RSAT Web server by providing HTTPS connections, the following steps should work on Ubuntu or Debian systems:
sudo apt install snapd
sudo snap install core
sudo snap refresh core
sudo snap install --classic certbot
sudo ln -s /snap/bin/certbot /usr/bin/certbot
# installation of certificate for Apache
sudo certbot --apache -d instance.name
# certificate renewal
sudo certbot renewMac OS X
Semi-automatic configuration
A semi-automatic configuration of the RSAT installation can be
done by providing some minimal parameters such as: (i) an IP address for
the web server and services, (ii) a site name for the RSAT instance and
(iii) the RSAT main directory. We will customize the first two
parameters below, set the RSAT main directory and then run the
configuration script.
5.1 Setting the IP address for your web server
Personal computer
If you install RSAT on a personal computer (e.g. a laptop) and intend to use it only for this machine, you can configure it with the local network’s IP.
Server
If you install RSAT on a server or if you intend to provide service
to external users, please replace XXX.XXX.XXX.XXX below by
the actual IP address of your server (e.g. for Virtualbox Virtual
Machines, we set the IP to 192.168.56.101). The ifconfig
util should be already available in the command line.
5.2 Choose a site name for your RSAT instance
You can choose an arbitrary name for your RSAT instance. For this
tutorial, we will call it my_rsat, but you are welcome to
use another site name.
5.3 Configuration of RSAT parameters
## Set the main RSAT directory path
export RSAT=${INSTALL_ROOT}/rsat
echo "RSAT ${RSAT}"
## Go to the main rsat directory
cd ${RSAT}
## Semi-auto configuration for VirtualBox VM
## (adapt IP address if required)
perl perl-scripts/configure_rsat.pl -auto \
rsat=${RSAT} \
rsat_site=${RSAT_SITE} \
rsat_www=http://${MY_IP}/rsat/ \
rsat_ws=http://${MY_IP}/rsat/ \
package_manager="brew" \
ucsc_tools=1 \
ensembl_tools=1You can add some additional options to the previous command, e.g. enter your mail address as server admin, activate some specific tools that are disabled by default.
Advanced configuration
To configure all options, you can run the script
configure_rsat.pl as below. An interactive prompt will open
and you will be able to refine all the configuration options by choosing
custom parameter for your RSAT instance (e.g. the email of the local
admin, the organism group, etc. ).
## Set the main RSAT directory path
export RSAT=${INSTALL_ROOT}/rsat
## Check that RSAT directory path has been specified
echo "RSAT ${RSAT}"
## Go to the main rsat directory
cd ${RSAT}
# Configure all the options
perl perl-scripts/configure_rsat.pl6 Installing RSAT
Linux
Before running the installation, it might be worth updating the Linux
distribution (apt-get update) in order to get the latest
versions of the basic packages. If your Linux OS is not Ubuntu some
adaptation of the scripts used in this step will be necessary
(e.g. system libraries).
## NOTE: you must now move to the $INSTALL_ROOT directory before becoming admin
cd ${RSAT}

## This requires admin privileges
sudo bash

## Go to the RSAT directory
export RSAT=`pwd`
cd ${RSAT}

## Check who you are  (should be root)
whoami

## Define your operating system
export MY_OS=ubuntu

## Read config and run bash installation scripts
source RSAT_config.bashrc && \
bash installer/01_${MY_OS}_packages.bash && \
bash installer/02_python_packages.bash  && \
bash installer/03_install_rsat.bash && \
bash installer/04_perl_packages.bash  && \
bash installer/06_install_organisms.bash && \
bash installer/07_R-and-packages.bash  && \
bash installer/08_apache_config.bash && \
bash installer/09_rsat_ws.bash && \
bash installer/10_clean_unnecessary_files.bash

## NOTE: the following command should be adapted to your case.
## Restore the *login* and *group* of the user owing the $RSAT folder.
chown -R MyLogin:MyGroup $RSAT
## Example:
##    chown -R rsat:rsat $RSAT

## Exit sudo session
exit

## Check who you are (should be back to normal user identity)
whoami ## This should give *YourUserName*
Mac OS X
## Go to the main rsat directory
cd ${RSAT}

## Read config file and run bash installation scripts for 'brew' packages
source RSAT_config.bashrc && \
bash installer/01_macosx_packages.bash

## NOTE: you must now move to the $INSTALL_ROOT directory before becoming admin
cd ${INSTALL_ROOT}

## This requires admin privileges
sudo bash

## Go to the RSAT directory
export INSTALL_ROOT=`pwd`
export RSAT=${INSTALL_ROOT}/rsat
cd ${RSAT}

## Check who you are  (should be 'root')
whoami

## Read config file and run the remaining bash installation scripts
source RSAT_config.bashrc &&
bash installer/02_python_packages.bash  && \
bash installer/03_install_rsat.bash && \
bash installer/04_perl_packages.bash  && \
bash installer/06_install_organisms.bash && \
bash installer/07_R-and-packages.bash  && \
bash installer/08_apache_config.bash && \
bash installer/09_rsat_ws.bash && \
bash installer/10_clean_unnecessary_files.bash

## NOTE: the following command should be adapted to your case.
## Restore the *login* and *group* of the user owing the $RSAT folder.
chown -R MyLogin:MyGroup $RSAT

## Exit sudo session
exit

## Check who you are (should be back to normal user identity)
whoami ## This should give *YourUserName*
7 Managing a RSAT Web server
7.1 Access logs
Each time a script is executed via the RSAT server, some basic information is stored in a log file. This information is minimal: it is restricted to the time, name of the script executed, and the IP address of the client machine. We do not want to store any additional information (e.g. selected organism, lists of genes), for obvious confidentiality reasons.
The log files are saved in the directory ${RSAT}/logs. There is one file per month.
7.2 Cleaning the temporary directory
The Web server stores result files in a temporary directory ${RSAT}/public_html/tmp. These files should remain 3 days on the server, in order to allow users to consult their results.
7.2.1 Manual cleaning
The RSAT package includes a make script to clean old files in the temporary directory.
This command cleans all the files older than 3 days. You can clean more recent files by modifying the variable CLEAN_DATE.
This will clean all files older than 1 day.
7.2.2 Automatic cleaning
The automatic management of the temporary directory can be greatly facilitated the crontab command. For this, you need to add a command to a crontab configuration file, preferably from a superuser.
Start editing the crontab; this will open your crontab file with a text editor available in your system.
Add the following line to execute the clean script daily at midnight:
0 0 * * * make -f ${RSAT}/makefiles/server.mk clean_tmpSave the modified crontab file and close your text editor.
8 Testing your RSAT instance
8.1 Testing the command lines
The script makefile/install_tests.mk runs a series of
tests for different components of the RSAT suite. Each test
result is stored in a separate file in the test directory
(./install_tests by default). Output file names are printed
out after each test.
## Load the RSAT configuration
cd ${INSTALL_ROOT}/rsat
source RSAT_config.bashrc

cd $RSAT
make -f makefiles/install_tests.mk all

## Check the results
ls -ltr install_tests
8.2 Testing the Web server
The RSAT Web site can be found at your host IP address followed by rsat: http://[my.computer.ip.address]/rsat/
e.g. for VirtualBox VM: http://192.168.56.101/rsat/
The web site can be tested by selecting any supported tool, clicking on the demo button and checking the result.
We usually use the following tools as diagnostic of the proper functioning of a server.
Supported organisms to check if the default organisms have been installed.
Fetch sequences from UCSC:
- is the list of organisms is correctly displayed (obtained dynamically from UCSC) ?
- run the demo: do you obtain fasta sequences ?
retrieve Ensembl seq:
- is the list of organisms is correctly displayed (obtained dynamically from Ensembl) ?
- run the demo 1 (single organism): do you obtain fasta sequences ?
convert-matrix: check that logos are properly generated
gene-info to feature-map: check that the genes are well returned with gene-info, then successively send the results throught the following tools:
gene-info demo -> gene list. Check if you obtain a table with genes. If so, under Next steps, click the button retrieve sequences.
retrieve sequences. Click “Run Analysis” then “GO”. In the result, check the fasta file. Next step: oligo-analysis.
oligo-analysis. In the result, check the k-mers (oligos) then the matrices and the logos. In the Next step box, end the result to string-based pattern matching.
dna-pattern
feature-map check that the png figure is properly generated and displayed.
At the end of this process the results should look like the figure below.
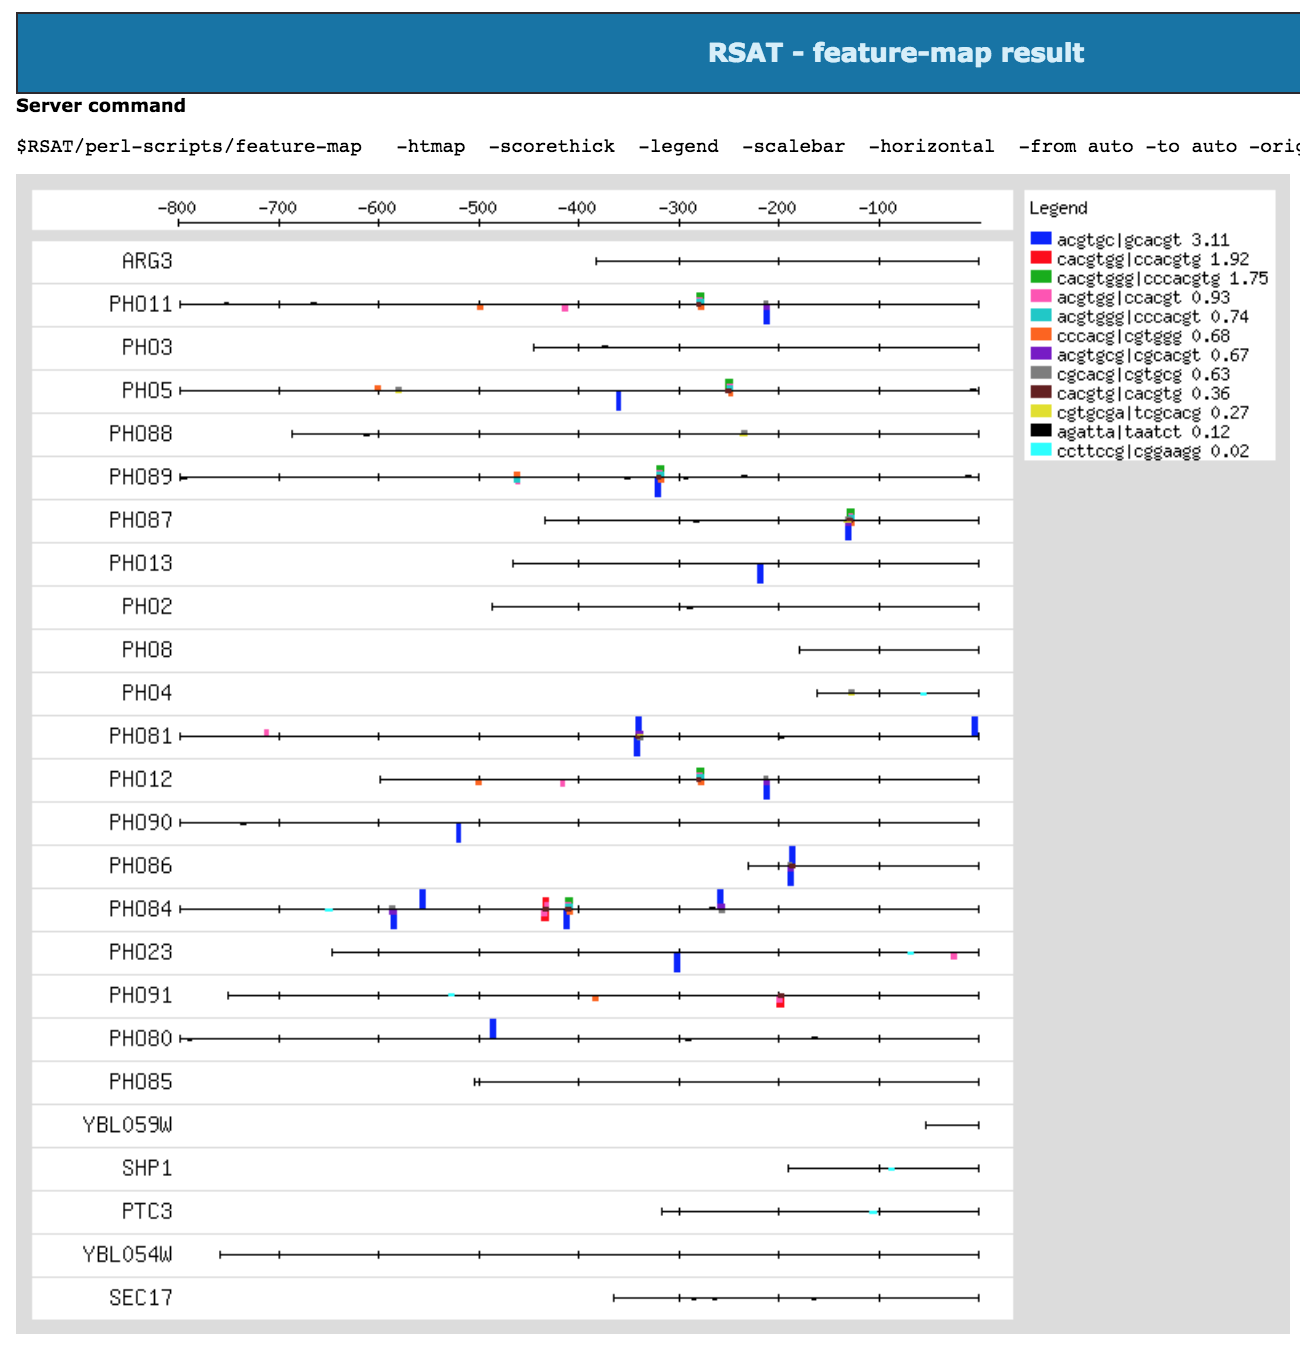
Feature-map result at the end of the pipeline from gene-info to feature-map.
8.2.1 Troubleshooting: 403 Forbidden Error
If a 403 Forbidden Error appears when you test your local RSAT
website such as with http://localhost/rsat/, follow the
next steps:
- First, check that the paths to your RSAT instance are right in the
RSAT web server configuration files at your
/etc/apache2/sites-enableddirectory.
As an example, in config file RSAT_config.conf, the
directory paths to your RSAT in the next chunk should look similar to
this (as signaled by arrows):
################################################################
## Define the alias.
##
## The RSAT server should be visible when adding this alias after the
## Web server URL.
Alias /rsat /home/user/packages/rsat/public_html/                 ## <-----

################################################################
## Make sure R libs are accessible to the apache user.
SetEnv R_LIBS_USER /home/user/packages/rsat/R-scripts/Rpackages/  ## <-----

################################################################
## Configuration for Apache 2.4

## Enable CGI scripts in the public_html directory
<Directory "/home/user/packages/rsat/public_html/">                ## <-----
    AllowOverride all
    Options +ExecCGI -MultiViews +SymLinksIfOwnerMatch +Indexes
    Require all granted
</Directory>

<Directory "/home/user/packages/rsat/public_html/data/">           ## <-----
    AllowOverride all
    Options +Indexes +SymLinksIfOwnerMatch
    Require all granted
</Directory>

<Directory "/home/user/packages/rsat/public_html/motif_databases/">  ## <-----
    AllowOverride all
    Options +Indexes +SymLinksIfOwnerMatch
    Require all granted
</Directory>

<Directory "/home/user/packages/rsat/public_html/tutorials/">     ## <-----
    AllowOverride all
    Options +Indexes +SymLinksIfOwnerMatch
    Require all granted
</Directory>
If that’s not the case, change them.
## check the RSAT path you defined before
echo $RSAT # copy the dir

## You need sudo permissions
sudo su

nano RSAT_config.conf
Replace the paths (such as /home/user/packages/rsat/ in
the example) for the dir/to/rsat you copied earlier, making
sure to keep the RSAT inner directories in the paths (such as
public_html/tutorials/) unchanged.
# CTRL + O to save
# CTRL + X to exit

nano RSAT_config_default_apache2.2.conf
## change paths
# CTRL + O to save
# CTRL + X to exit
Repeat process for RSAT config files at
/etc/apache2/sites-available.To make sure
.cgiscripts work:
- Restart apache:
- Give permission in your RSAT instance
- Your RSAT web server should work now.
8.3 Testing the Web services
8.3.1 SOAP/WSDL interface
8.3.2 REST interface
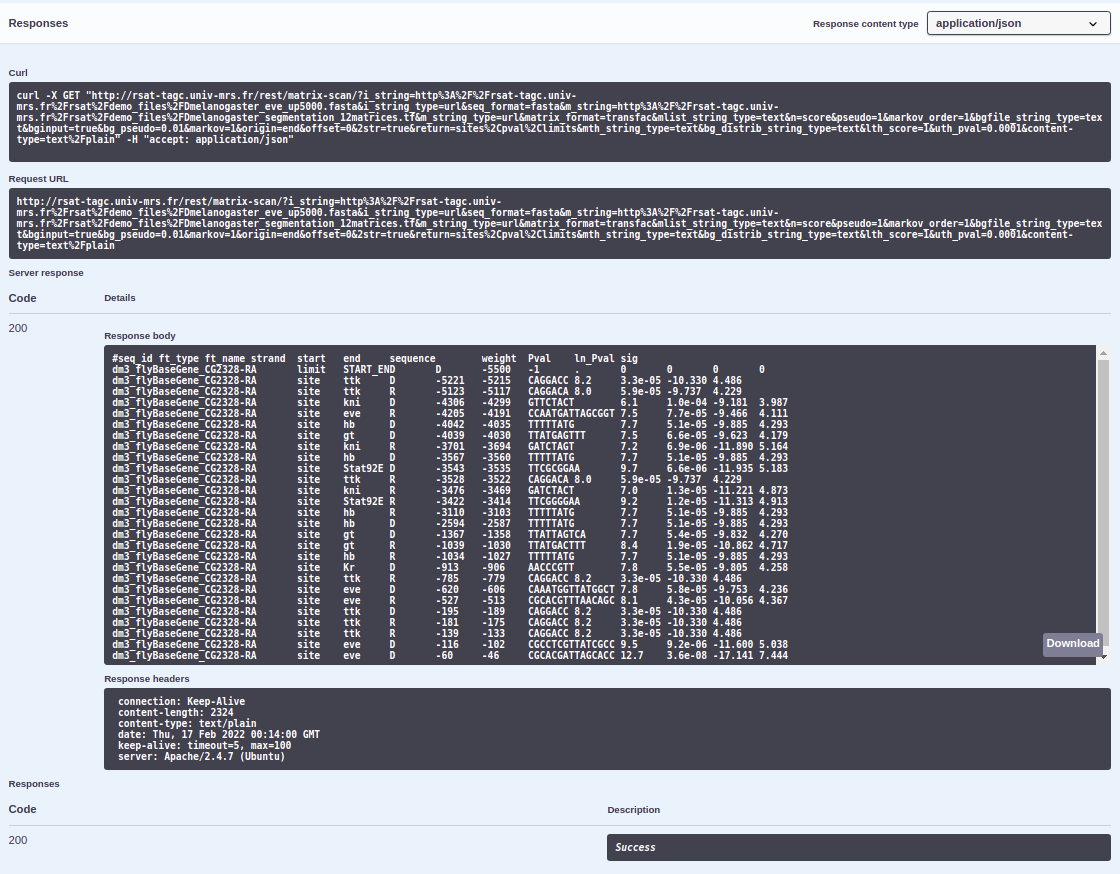
Click here for a web version of REST.
As an example, we are running matrix-scan’s DEMO
1:
In this demonstration, we will analyse the promoter of Drosophila melanogaster even-skipped gene (eve). We will scan the 5500 bp sequence upstream the transcription start site with matrices representing the binding specificity of 12 transcription factors known to regulate eve. These matrices were built from binding sites annotated in the ORegAnno database by Jean-Valery Turatsinze.
8.3.2.1 Script
This is an example for using REST-API scripts which are available in
your RSAT instance in dir
$RSAT/public_html/web_services/REST-API. Demo data for
these scripts is available at
$RSAT/public_html/web_services/REST-API/restclientexamples/demo-data_4rest-api.py.
Open file
$RSAT/public_html/web_services/REST-API/matrix-scan.pyin the text editor of your choosing.Copy the script in a separate file and name it (for example:
~/test_matrix-scan.py).Edit the
data{}dictionary to change the arguments with which to runmatrix-scan. We are changing the arguments to run the DEMO 1 mentioned above.
Edit the following arguments as follows, read the comments for information regarding them:
# fasta sequences where we are going to look for sites (Drosophila melanogaster 5kbps upstream from eve gene)
        "i_string" : "http://rsat-tagc.univ-mrs.fr/rsat/demo_files/Dmelanogaster_eve_up5000.fasta", ##Input string specifying the query. The value can be the query content, the URL of a file available on some Web server, the internal path of the result file returned by another tool of this RSAT server (piping for workflows).
        "i_string_type" : "url", ##Type of information provided by the input string. Supported values: url: URL (Web address) to the input file; piping: result file from other tool; text: input content
        "seq_format" : "fasta", ##String. Sequence format.
        # transcription factor binding motifs matrixes or PSSMs (12 motifs for TFs known to regulate eve)
        "m_string" : "http://rsat-tagc.univ-mrs.fr/rsat/demo_files/Dmelanogaster_segmentation_12matrices.tf", ##Input string specifying the query. The value can be the query content, the URL of a file available on some Web server, the internal path of the result file returned by another tool of this RSAT server (piping for workflows).
        "m_string_type" : "url", ##Type of information provided by the input string. Supported values: url: URL (Web address) to the input file; piping: result file from other tool; text: input content
        "matrix_format" : "transfac", ##String. Matrix suffix. This argument is mandatory.
        "n" : "score", ##String. Treatment of N characters. These characters are often used in DNA sequences to represent undefined or masked nucleotides. Supported: skip, score.
        "pseudo" : 1, ##Number. Pseudo-count for the matrix (default 1).
        "markov_order" : 1, ##Integer. Markov order for background model. Only when bgfile is not specified.
        "bginput" : True, ##Boolean. Calculate background model from the input sequence set.
        "bg_pseudo" : 0.01, ##Number. Pseudo frequency for the background model. Value must be a real between 0 and 1
        "markov" : 1, ##Integer. Order of the markov chain for the background model.
        "origin" : "end", ##String. Specify the origin for the calculation of positions. Supported: start, end, center, chrom
        "offset" : 0, ##Integer. Add a given number to site positions (change the reference point).
        "2str" : True, ##Boolean. Scan both strands for DNA sequences
        "return" : "sites,pval,limits", ##String. lists of fields to return. Supported fields - sites, p_score, pval, seq_scores, rank, normw, proba_BM, limits,weight_limits, distrib, occ_proba, bg_model,bg_residues, matrix, freq_matrix, weight_matrix,crer
        # weight score. Positive means that the scanned seq is more likely to be an instance of the motif
        "lth_score" : 1, ##Number. Lower threshold on some parameters.
        # upper threshold p-value. Correction of weight scores
        "uth_pval" : 0.0001, ##Number. Upper threshold on some parameters.
**Make sure to keep the indentation the same!
Open the terminal (
CTRL + ALT + Tin ubuntu). And go to the directory where you stored the file (for example:cd ~/).Either run the file
python3 test_matrix-scan.pyor copy paste the script in the python CLI.You can add the following lines to store your results in a html document:
8.3.2.2 Web
Using the same example shown for the scripts version (matrix-scan DEMO 1), we will exemplify now how to use the web version of REST.
Go to REST. Here will appear all the RSAT programs available through REST at the moment, along with a description of what each of them do. Search the program
matrix-scanand click on it.Click on the
GETbutton > thenTry it out. A list of all the program’s parameters with a short description will appear as well as a field to introduce their value.
![]()
Fill all mandatory and chosen optional parameters value. We will fill it in as we did in the scripts version.
i_string:http://rsat-tagc.univ-mrs.fr/rsat/demo_files/Dmelanogaster_eve_up5000.fastai_string_type:urlseq_format:fastam_string:http://rsat-tagc.univ-mrs.fr/rsat/demo_files/Dmelanogaster_segmentation_12matrices.tfm_string_type:urlmatrix_format:transfacn:scorepseudo: 1markov_order: 1bginput: Truebg_pseudo: 0.01markov: 1origin:endoffset: 02str: Truereturn:sites,pval,limitslth_score: 1uth_pval: 0.0001
- Click on the
Executebutton. After a ~min a result like this should appear. You may see your results through the Request URL or in the Response body.